Facebooktwitterlinkedinyoutubeinstagram

by Carrie Lynn

Blog

Sale!!! Stitch your way to Christmas

Sale!!! Stitch your way to Christmas

All print Christmas pattern are 50% off. Select print patterns, including some of our best sellers, are up 75% off.   Angels We Have Heard on High – 50% off Print Silent Night – 50% off Print Reindeer Ornament – 50% off Print Christmas Tree […]

Website Enhancements

Website Enhancements

We’re happy to announce that we’ve update the security on our website and further optimizations for speed and reliability.

Tutorial – Mug Cozy

Tutorial – Mug Cozy

In 2016 I’ll be releasing a pattern a month for the purpose of making a mug cozy!  I just released the first one this month, and February will be out shortly.  Keep an eye out for all of them through the year.

There are basic instructions for sewing and finishing the cozy included with every pattern – every month.  But I thought it might be nice to include a photo tutorial to talk you through the process, especially for those of you who are beginner sewers.

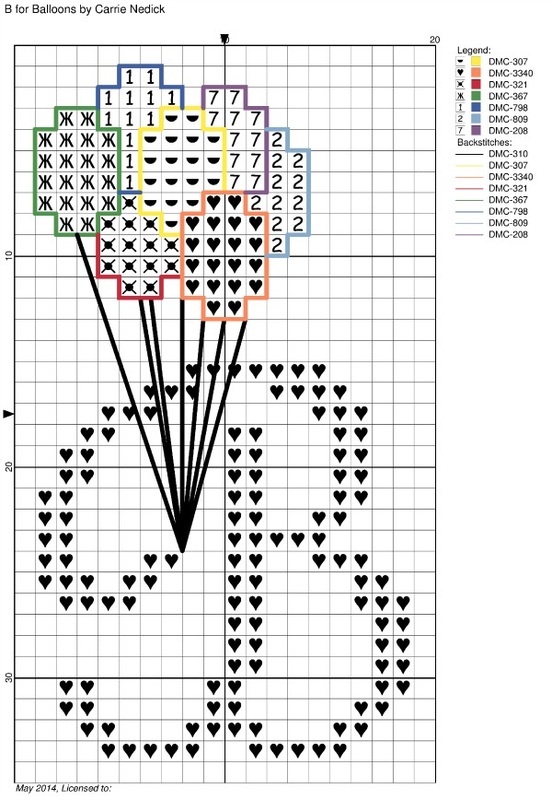
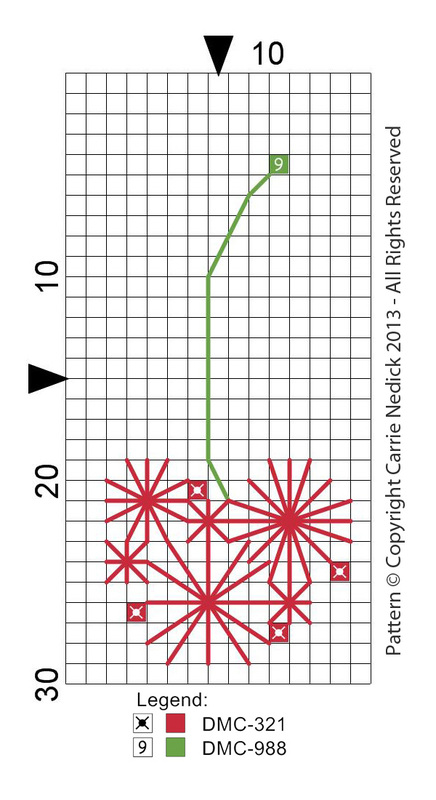
The first part of completing the mug cozy is to complete the cross-stitch pattern.
Once you have that done you’ll need:
– 1/4 yard of fleece fabric (there are fabrics that you can get at Jo-Ann that go with each month’s pattern, or you can choose your own.  Make up your own color scheme for the cross-stitch while you are at it!  This is YOUR creation)
– A single sheet of felt or other insulating fabric
– A pattern for the cozy (it comes with your cross stitch pattern)
– Scissors, thread, iron and ironing board, button, piece of elastic (or a hair tie if you are resource like me)


Fold your fabric in half and then in half again with wrong side facing
Place the pattern on the folded edge of the fabric as marked and pin it in place and cut the pattern out of the fabric.
Remove the bottom layer that you cut out of the pattern, and repin the pattern over the top layer.  Cut out the piece marked for the top layer only and snip 1/4 slits at the corners as marked.

Fold your felt or insulating fabric in half and use pattern piece to cut out one piece.

You should now have 3 pieces that look like this:

This next part is REALLY important: How to layer the pieces in order to sew them together.

Lay your pieces in front of you just as they look in the picture above: The piece with the hole is wrong side up, the solid piece is right side up, and the insulating piece doesn’t matter.

First: Lay the piece with the whole (wrong side up) on top of the solid piece (which is still right side up).

Next: Lay the two stacked pieces, just as they are, on top of the insulating fabric.

Finally: Fold back the top layer on one side and place hair tie (or looped elatic) in between the top two layers.  Make sure the end of the elastic are at least 1/4 of an inch inside the edge so that they will get sewn in.

Pin it all the way around.  Sew around the edge using a 1/4 inch seam allowance.

It’ll look like this:

Trim off the seam allowance, making sure to not snip the actual seam and to not snip the elastic loop!

Using the hole in the center, turn the piece so that it is right side out!  (Exciting :-D)
Use a pin to pull out the corners in the tight spots.  (Guest appearance from my baby bump at the bottom of this photo!)

Iron the edges of the piece to straighten the seam and prepare for the next step.  BE CAREFUL!!  I used a synthetic felt on the inside and when my iron touched it directly it melted onto my iron (I caught it early, so it wasn’t too terrible).  If you use felt as an insulator either avoid touching it with the hot iron (just iron around it) or test a TINY bit to make sure it won’t melt.

Next you’ll need to center and trim your cross-stitch piece so that it fits nicely into the hole in the top layer.trim it so that it fits almost exactly into the full height of the cosy – this will ensure enough for the seam allowance you’ll need later on.
Fit the cross-stitch into the opening and fold under the flaps that were created when you made those slits back in the cutting phase of this project.  Take a bit of time to fit it exactly as you want it, iron the flaps down, and then pin it all in place.

Top stitch as close as you can to the edge of the inside opening and around the outer edge of the cozy.

The final step is to try this baby on your favorite mug, pull the elastic a little bit to help you choose the best place for a button, and then sew the button on by hand.

The final FINAL step is to enjoy your favorite hot beverage.

Facebooktwitterlinkedin
New Release!  Birth Announcement

New Release! Birth Announcement

There is nothing like finding out you are pregnant with Baby #3 before you have even finished the DESIGN for the birth announcement for Baby #2!  That’s what happened to me in early June, as my half finished design for the announcement for my almost […]

2 Rows a Day

2 Rows a Day

Sometimes I knit.  I feel like that is sort of a confession right now.  Who has time to knit?  Not me!  I need to be focusing on designing and cross-stitching!  But the thing is, I started this sweater in a size for 2 year old […]

An Alphabet Sampler for Baby

An Alphabet Sampler for Baby

Lately I’ve been working on designing a new alphabet birth sampler.  I had a few requirements for this piece.  I wanted it to be gender neutral, not too babyish, simple to stitch, and colorful.  So far I’m pretty happy with it, and hope to finish the design this week. I think my mom is on board to do the model stitching for this one!

Here is a sneak peak!

Facebooktwitterlinkedin
New Video Tutorial (And a bonus baby picture :-D)

New Video Tutorial (And a bonus baby picture :-D)

I use a lot of eyelet and other “starburst” speciality stitches in many of my designs, so I decided it might be nice to put together a video on how to actually work those stitches.  They are simple once you get the idea, and a […]

Waiting For Baby

Waiting For Baby

What do you do while you wait for a baby?
– set up the nursery – check
– pack your bag – check
– wash baby clothes – check
– make a random curtain – check
– all other nesting and home preparations – check check checkSo I guess it’s time to stitch up a quick design!
Facebooktwitterlinkedin
Just CrossStitch Magazine Feature

Just CrossStitch Magazine Feature

It’s here!!  I’m the centerfold, on page 36.  Thank you to everyone who made this possible.  Please support the magazine by buying this months (April 2014) issue, it is featuring a trio of new floral designs by Cherry Lane Designs, plus so much more. I’m […]

Snowy Day Curtain

Snowy Day Curtain

Update: Got it mostly stitched together!  Just left is the bottom hem.   I was finally inspired to start working on a big curtain for our redesigned dining room.  At my pokey sewing pace it may not be done in time for the baby, but […]

New Year – New Baby (SOON!)

New Year – New Baby (SOON!)

As I am nearing the end of a pregnancy my extracurricular activities have been suffering. I wish I had been writing about this all along, because I think I would find my phases of crafting would directly relate to my phases of pregnancy:

– 1st Trimester – nap, nap, nap, stitch like crazy because I’m losing all my stitching time to napping… and then more napping
-2nd Trimester – reality kicks in and I am suddenly very aware of an impending baby – knit, knit, knit, stitch like crazy because I need to have a new release for Christmas… and then more knitting
-3rd Trimester – nap… knit… stitch… Just forget it I can’t get comfortable enough to do anything

And that is where you will find me: Halfway through a navy blue knit sweater, more designs ready to be stitched than I care to admit, and me unable to nap because I just can’t get comfortable enough to do any of it.

I had huge plans for Cherry Lane this past year. I also had huge plans for my family; we were ready for another baby. I know many women are “super moms” and manage to balance children, full-time jobs, pregnancy, and budding businesses with grace and near-obsessive energy. I must admit, that while I like to think that I could be one of them, I haven’t been able to live up to that. My family has come first through most of this, which means that my wily three-year old takes up much of my evenings, and that my mind and heart are working to prepare room for a new addition. These last few weeks before my due date I intend to do some soul searching and Cherry Lane planning to bring this endeavor slowly back to the forefront.

I’ve always known that keeping this business would be the most difficult with small children, but I wanted to get my feet wet, and I love every minute!

Facebooktwitterlinkedin